
Have you had problems with your scroll-saw's blade tension? You're not alone. Many people have a hard time determining the proper blade tension for flower patterns on their scroll saw. The following article will cover blade tension, Stack cutting, the Workpiece foot lock, and how to identify each component of the scroll saw. This article will explain what to do and how you can adjust the tension for flower designs.
Adjusting the blade tension to create scroll saw flower designs
When using a scroll saw, it is essential to use the right blade and adjust the blade tension. The scroll saw may not work properly if these two elements are not correctly adjusted. While the blade can come in many styles, the tension setting should be consistent with the design. Scroll saw manufacturers may have their own methods for setting tension. Refer to your manual for the most detailed instructions. These are some useful tips.
First, ensure that the blade is in line with the table. A protractor or small square can help you do this. Moreover, the scales on your scroll saw's blade-tilt will not be accurate. You should check the scales regularly. After you have adjusted the blade tension, you can begin cutting the flower patterns. Make sure the blades don't get too tight or loose.
Stack cutting
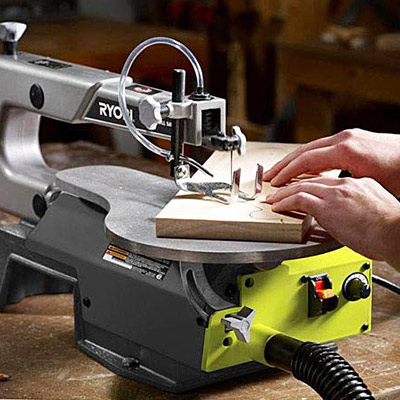
First, stack a few pieces together of wood to make a scroll saw floral pattern. Double-sided tape is used to secure the pieces. Some scrollers use small nails or toothpicks to secure their stacks together. As binding tools, you can use staples or even old circular saw blades. This will prevent the layers of material from shifting. Once each layer is attached to the other, you can begin cutting.
Magnification allows for more precise cuts. It is possible to mount a magnifying glass on the scroll saw, or use a lens for your tool. A magnifying LED work lamp can also be purchased to better illuminate your work area. Many work lights come with a clamping or magnetic base that makes it easier for you to move around. There are many kinds of scroll saws. You can choose the one that best suits your needs.
Locking workpiece foot
There are many options to choose the right drop foot that will fit your scroll saw. The foot should be positioned on the workpiece, and it should not drag. After making adjustments, be sure to tighten the footlock on your workpiece. Next, adjust the speed adjustment knob until you reach the desired setting. The material to be cut, the thickness of the material and the number or teeth of the blade will affect this setting. Finally, ensure that the workpiece is securely secured in the dropfoot.
Scroll saws may not be the right tool for every job. These are tools that are designed for specific tasks. You should use the workpiece feet lock to ensure that the wood is secure while you cut flowers. This will prevent the workpiece from moving while you are cutting. You should also consider how much weight you intend to use for the cut. A larger blade might be a better choice if you are planning to cut large flowers.
Identifying the components of a scroll saw
Scroll saws are generally classified by their throat size, which is the distance between the blade and rear frame of the saw. The throat size dictates the size of the wood that can be cut. The throats of smaller saws are shorter, while those of larger size have deeper throats. Before computers were invented, industrial saws could be used to cut larger objects. For most home projects, however, a simple scroll saw will suffice.

You can download a free scroll saw pattern for flower scrolls if you're not sure where to begin. These patterns also come with detailed instructions. These patterns can be used to decorate your home with beautiful ornaments. You can also use them in your classroom or kitchen as a decorative item. They are also great for creating practical items. It can be difficult to identify the parts of a scrollsaw flower pattern, but it is possible!
FAQ
What's the difference between a hobbyist and a professional woodworker?
Hobbyists enjoy creating things out of wood. Professionals tend to focus on the quality. Hobbyists usually take pride in their creations and often share them with friends and family. Before they start working on a project, professionals will spend hours researching the designs. They'll be meticulous about every aspect of their work, from choosing the best materials to finishing it perfectly.
What amount of money do I need to get started with my business?
Because each project is unique there are no exact numbers. These are the factors that will give you an idea of how much you'll need.
-
Cost of materials
-
Tools and equipment
-
Time spent working on this project
-
Hourly rate
-
What amount of profit can you expect to make?
-
Hire help
You might start small if you are just starting out. As you gain more experience, you will be able tackle more complicated projects.
What time does it take for furniture to be finished?
It all depends on how large the furniture is. Smaller projects like boxes and picture frames can be finished within one day. Larger projects like tables and desks take many days. It takes time for the wood to be stained and sealed properly.
Statistics
- In 2014, there were just over 237,000 jobs for all woodworkers, with other wood product manufacturing employing 23 percent; wood kitchen cabinets and countertop manufacturing employing 21 percent. (theartcareerproject.com)
- The U.S. Bureau of Labor Statistics (BLS) estimates that the number of jobs for woodworkers will decline by 4% between 2019 and 2029. (indeed.com)
- Overall employment of woodworkers is projected to grow 8 percent from 2020 to 2030, about as fast as the average for all occupations. (bls.gov)
- If your lumber isn't as dry as you would like when you purchase it (over 22% in Glen Huey's opinion…probably over 10-15% in my opinion), then it's a good idea to let it acclimate to your workshop for a couple of weeks. (woodandshop.com)
External Links
How To
How to make wood joints
This tutorial will teach you how to join two pieces wood together. We will use the "pockethole joint," which means that we drill holes in the wooden pieces and then glue them together. This method works great if your wood is straight and smooth. Try dowel joinery instead if your wood doesn't look straight. Here are the steps
-
Drill Pocket Hole Joints. You will need to measure and mark the exact location of your pocket hole joint. You will then drill 3/4" deep holes through each piece of wood with a jigsaw, handheld drilling machine, or hand-held drill.
-
Sand Smooth. Sanding the wood's edges will ensure that the joint doesn't split.
-
Glue together. Apply glue to both sides of the wood. Allow it to sit for approximately 5 minutes before you clamp the pieces together.
-
Clamp the Pieces Together. After the glue has dried thoroughly, secure the pieces so that they are flush.
-
Trim Joinery. Trim the excess wood around the joint after the glue has dried completely.
Make sure to leave enough room between the pieces so that you can turn them inside and out.