
You might want to look into the classes offered by your local community college if you're interested in learning how to make ornaments. There are many crafting options, and woodturning doesn't disappoint. You can even turn a wooden bowl or spoon into a Christmas tree decoration. Here are some helpful tips for beginners. First, find a class you love. Woodturning, for example, is a great option if you enjoy the look and complexity of woodturning.
Dale L. Nish
Dale L. Nish, one of America's most respected woodturners, has been teaching his art and demonstrating it to the general public for many decades. His latest book, Woodturning with Ray Allen, is one of many on the subject. Dale L. Nish is also the author of Creative Woodturning. Artistic Woodturning and Mastering the Art of Woodturning are other books.
Dale L. Nish presents step-by-step instructions for making woodturned Christmas ornaments. This comprehensive guide contains color photos, detailed plans, and expert tips about using templates. You will also find ornament ideas from top woodturning artists in the book. If you want to make beautiful wooden ornaments for your tree this holiday season, this book is a must-have!
Dick Sing
Dick Sing explains how to make various kinds of wooden ornaments. He includes step-by–step instructions, such as making eggs and bowls from icicle spindles to eggs. Throughout the book, he offers a variety of color photos to guide you through each project, as well as helpful tips for selecting the right woods and using the tools correctly. The book also contains many ideas for Christmas gifts as well as numerous woodturning ornaments that will make great gifts for anyone on your gift list.
Dick began woodturning demonstrations in Racine, WI, as an aspiring woodturner. His first demonstration was greeted with a shiver beneath his lathe. Soon Dick began to receive requests for demonstrations at craft shops, art fairs, and festivals throughout the country. A call came from a California craft club. It was the beginning of the end. Dick Sing has been demonstrating and teaching since 1989, and has written nine books on woodturning and is available for private lessons.
Acacia trio
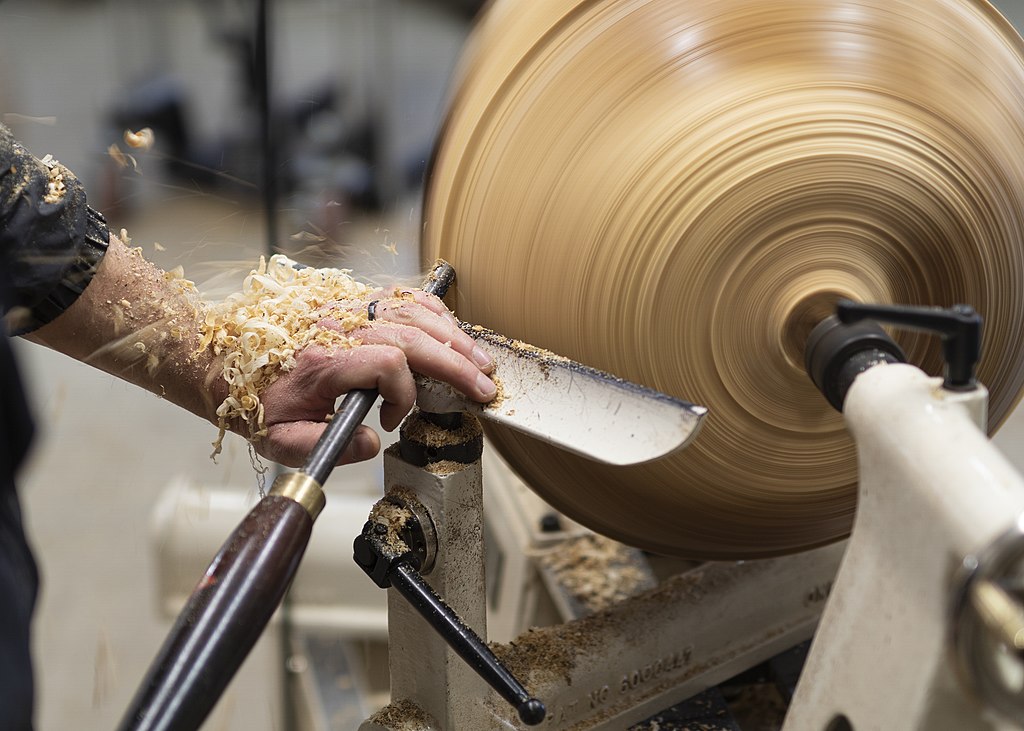
The Acacia trio of woodturning ornaments is a stunning ornament made of real sea urchin shells and turned ebony finials. Each piece is approximately 7 inches in length and hangs on monofilaments. You will need to use a drill and a small bit. Measure the ornament to be made. Next, mark the center of the square with a pencil. Next, slide your spur onto the spindle. After you have the wood positioned, power on the lathe. Use a roughing tool to turn the wood. Next, use a parting knife to finish the job and add details to the ornaments.
Sputnik
For a unique gift that will be remembered for years, consider a Sputnik Sea Urchin handturned ornament. The ornament is distinctive with its distinctive horn-like protrusions and wavy colors that are sure to catch the recipient's attention. The shell has been crafted to fit the finial. It can be made from maple, bloodwood or other wood and is coated with protective spray clear enamel. The space-themed ornaments are perfect for any occasion and will make a great conversation piece.
Visit the Met Opera Shop to purchase wooden ornaments inspired in Sputnik chandeliers. Each ornament is 3 1/2 inches in diameter and comes with a ribbon of gold to tie it together. You can choose to buy a single ornament or a set of three. You can protect your ornaments with one or two of the sets, which include four Sputnik-themed ornaments. They will be shipped via USPS Priority Mail Flat Rate.
Acacia trio by Dale L. Nish

For nearly three decades, Dale L. Nish has made a profound impact on the woodturning industry as an author, teacher, and international speaker. His work has been featured on more than 200 occasions during his travels and he has also written many articles. Here are his best tips to create ornaments. He also includes a gallery with his favorite turners.
Acacia trio by Dick Sing
This book provides step-by–step instructions along with color photographs to show how to make an Acacia trio woodturning ornate. The book also contains tips for beginning woodturners such as how to choose the right wood for your project and what tools you should use. This book also has a tutorial for hollow, carved wood eggs. Buy a copy if you are interested in making these unique ornaments.
FAQ
How do I calculate woodworking prices
The most important thing to remember when calculating costs for any project is to keep them as low as possible. Make sure you're getting the best prices on materials. Also, consider all other factors that can affect the price of your projects such as skill level, experience, time and cost. Our guide to the average household DIY task price will give you an idea of how much it costs to complete different types of woodwork projects.
What should a woodworker be paid per hour?
The hourly rate paid to a professional woodworker is dependent on many factors. These include skill level, availability, and location.
The hourly average rate for skilled woodworkers runs between $20-$50.
A woodworker with less experience may be able to charge $10 an hour.
Where can I locate free woodworking plans
Free woodworking plans are available online. You don't even need to buy books or magazines. Just search Google. Just enter "free woodworking" into the search bar, and you'll see hundreds of websites where you can download free plans.
Do you have the skills to learn woodworking?
It is best to do it yourself. Woodworking is an art form that requires patience, practice, skill, and experience. Any craft requires patience to master.
It is the best way to learn to do something is to actually do it. Start small and learn from your mistakes.
Can I succeed in woodworking if I'm a genius?
No. Woodworking is not rocket science. Anyone can learn how to use basic power tools and techniques to create beautiful works of art.
How do I organize my shop?
A designated place to store your tools is the first step towards keeping your workshop clean. Keep your tools away from dust and debris, so they stay sharp and ready to work. Use pegboard hooks to hang tools and accessories.
What time does it take for furniture to be finished?
It depends on the size and condition of the furniture. Boxes and picture frames are small projects that can be completed in one day. Larger projects, such as desks and dining tables, can take several days. It takes time and effort to properly stain the wood.
Statistics
- Most woodworkers agree that lumber moisture needs to be under 10% for building furniture. (woodandshop.com)
- The best-paid 10 percent make $76,000, while the lowest-paid 10 percent make $34,000. (zippia.com)
- Average lumber prices rose about 600 percent between April 2020 and May 2021. (familyhandyman.com)
- In 2014, there were just over 237,000 jobs for all woodworkers, with other wood product manufacturing employing 23 percent; wood kitchen cabinets and countertop manufacturing employing 21 percent. (theartcareerproject.com)
External Links
How To
Tips for driving a nail in wood
When driving a nail into wood, it is important to first choose the correct size and kind of hammer. The most common types of hammers are claw hammers, sledgehammers, mallets, ball peen hammers, and hatchets. Each type of hammer has its pros and cons. A claw hammer is best for hitting nails or hard objects. However, it can be difficult to pinpoint exactly where the blow will land. A sledgehammer allows you to hit large areas simultaneously, but it is too heavy and cumbersome to use for small tasks.
After you've chosen the right tool, hold your hand flat to the handle so it rests comfortably in one of your palms. Grab the handle tightly, but do not squeeze too hard. Keep your wrist relaxed and the hammer straight up. You should then swing the hammer straight up, keeping your wrist relaxed. You should feel the impact of the hammer striking the nail. You can practice swinging the hammer with a block or wood until you feel the rhythm.
Hold the hammer near your body until you're ready for the nail to be driven. The nail should be perpendicular to wood's surface. Keep your attention on the tip. Then, swing the hammer forward. Next, follow the motion of your hammerhead. You can repeat this several times, increasing your swing speed. Once you've mastered the technique, try adding power to your swings. Try holding the hammer above your shoulder and bring it down forcefully. You will be able to use more energy and put your best foot forward.
Once you have successfully drilled the first hole in the nail, remove the hammer. The rest of the nails can be pulled out using a screwdriver, pry bar, or a hammer. Keep the nails heads in line with the surface of the board to prevent splitting the wood.