There are many ways to ensure your table saw works properly. Push sticks are a good way to keep the fence straight and ensure the blade is the correct depth. Other tips are based on experience and will improve your cutting results. Read on to discover these and more tips. Practice is also important! You will be a pro after reading this article. No matter what kind of material, you'll be astonished at how many possibilities you have!
Push sticks
A great way to increase the safety of your work while using a table saw is to make use of push sticks. You can get store-bought ones that are made of hard plastic that can break and fragment when the blade strikes it. Buy one made of ABS plastic, or nylon that has fiber-filled. Avoid aluminum pushsticks as they can kick flak back at your blade. You should instead buy one that is at most 1/4 inch thick.
Blade depth
If you are using a tablesaw, it is important to measure the blade depth in millimeters. However, this measurement is not mandatory. The CPSC staff examined the data and determined that this voluntary standard does not have any effect on table saw safety. The following are important points to consider when choosing table saws. The blade should never be more than 4mm below skin surface. You should also consider other dimensions, such as length and width.

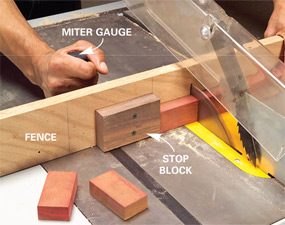
Fence alignment
When using a table saw, it is important to check the fence alignment periodically. You must align the fence within 15 to 20 percent of your blade's depth. This is why it is so important to check the alignment of your table saw's fencing frequently. Aligning your table saw's fence properly is essential for obtaining great cuts. To do this, you can use a scrap piece of wood, feeler gauges, or a solid measuring tool. Simply bring the fence to within a few inches of the blade, then use a feeler gauge to measure it. You can check if the fence is perfectly aligned by rubbing your finger along the blade's tooth.
Bridle joints
The versatility of bridle joints makes it easy to make joinery. They can be used in many types of woodworking projects. The advantages of a bridle joint include strength, ease of machining, and a finished look. It is seldom used in furniture. Another example is the mortise-and tenon joint. To make a Bridle Joint, first you need to create a mortise on one wood piece and a tension on the other. You can now glue the two pieces together once you have made the tenoning joints.
Outfeed jig
Whether you're starting out on a DIY project or modifying your current table saw, outfeed jig tables can be a great way to increase the flexibility of your workspace. For example, you can build an outfeed table for a larger table saw by milling miter slots into the outfeed table's outfeed table stand. Then, you can install an outfeed jig on it to help you adjust the height of your table saw.
Blade guard
These Blade Guard table saw techniques will ensure your fingers are safe while you're cutting wood. First of all, visualize the trajectory of the cut. To avoid kickback, do not place your hands in awkward positions. This can cause the blade's to grab the workpiece before you complete cutting it. Crosscutting is another technique that you can use to avoid the workpiece getting stuck or bind to the blade. Practice this technique regularly to make sure you're always one step ahead.

Dust collection
There are many options to collect dust from table saws. Dust collection is important whether you are building cabinets, doing home renovations, or just cutting wood. It is important to find a dust collection system that will fit your table saw's dust port. These systems capture most of the sawdust created during work. They keep your work area clean so you can breathe easily. Unlike a regular vacuum cleaner, table saw dust collection systems are made from heavy-duty fabric and have a sturdy zipper. The best table saw dust collection bags will collect as much as 70% of the dust generated by the machine.
FAQ
Where can you find free woodworking blueprints?
To find free woodworking plans, you don't have to buy any magazines or books. You only need to Google search. Simply type "free woodworking” into the search box and you'll find hundreds of websites that offer free plans.
How much should a skilled woodworker earn per hour?
The hourly rate for a professional Woodworker will vary depending on many variables, such as experience, skill level and availability.
The hourly average rate for skilled woodworkers runs between $20-$50.
A less skilled woodworker might charge as low as $10 per hour.
What is the minimum amount I will need to start?
Because every project is unique, there aren't exact numbers. These are the factors that will give you an idea of how much you'll need.
-
Material cost
-
Tools and equipment
-
Time spent working on this project
-
Your hourly rate
-
What amount of profit can you expect to make?
-
No matter if you are looking to hire someone
You might start small if you are just starting out. As you gain more experience, you will be able tackle more complicated projects.
Statistics
- Most woodworkers agree that lumber moisture needs to be under 10% for building furniture. (woodandshop.com)
- Average lumber prices rose about 600 percent between April 2020 and May 2021. (familyhandyman.com)
- The U.S. Bureau of Labor Statistics (BLS) estimates that the number of jobs for woodworkers will decline by 4% between 2019 and 2029. (indeed.com)
- The best-paid 10 percent make $76,000, while the lowest-paid 10 percent make $34,000. (zippia.com)
External Links
How To
How to join hardwood without using nails
Woodworking is an enjoyable hobby. It is relaxing and enjoyable because you can create something useful with wood. You might want to join two pieces from the same wood, but you don't need to use nails. This article will teach you how to do this to keep your woodwork projects looking great.
First, remove any sharp edges from the wood pieces before you join them. Do not leave any sharp corners as they could cause problems down in the future. After you have completed this step, you are ready to glue your boards together.
When working with hardwood, glue should be applied only to one side. If you are using softwoods such pine or cedar, glue should only be applied to one side. After applying the glue, press the boards firmly until they are completely stuck together. After applying the glue, let dry the boards before proceeding to the next stage.
After you have glued the boards together, drill holes in the joints where you intend to place screws. The size of these holes depends on what type of screw you choose to use. If you plan to use a 1/2 inch wood screw, drill a hole at least 3/4 inches in depth.
Once you've drilled your holes, you'll want to drive the screws through the joint and into the backside of the board. You should be careful not to touch the board's front surface. This could cause damage. When driving the screws, try to avoid hitting the ends of the screws too much. This will prevent splitting in the end grain of the wood.
You'll need to protect your completed project from the elements. You can either cover the entire furniture or just the top. It doesn't matter what method you use, you want something that will last many years. Some examples include oil-based varnishes, polyurethane, shellac, lacquer, etc.
These products are available at most home improvement stores. It is important to ensure that you purchase the correct product for the job. Don't forget to keep in mind that some finishes are toxic. Always wear protective gear when handling any of these finishes.