
This comprehensive guide covers all aspects of segmented wooden turnings. Keeling also discusses changing technologies used to create segmented wooden turnings. He also discusses safety and health concerns in working with wood. The book features 10 projects with increasing difficulty as well a gallery of inspiring segmented design examples. The book is intended for beginners to learn the basics of segmented turniment making, but it is not an exhaustive guide to those who want to create the most beautiful turniments.
Techniques
In Techniques for Segmented Wood Turnings, William Smith provides step-by-step instructions for making segmented turned objects. This woodworking method is very effective at creating intricate vessels. This method is especially suitable to beginners. Basic knowledge in woodworking is required before you can start. If you have any experience in the field of turning, it is ideal. After mastering the basics, you can move on to more advanced techniques.
Materials
There are many options for creating segmented woodturns. These can be made using stave or ring construction. Wood expands in a perpendicular direction to the grain. The turner must be aware of the non-parallel grain directions, and take precautions to prevent damage to the piece. This book will help you understand the basics of wood turning and show you how to do it in different styles.
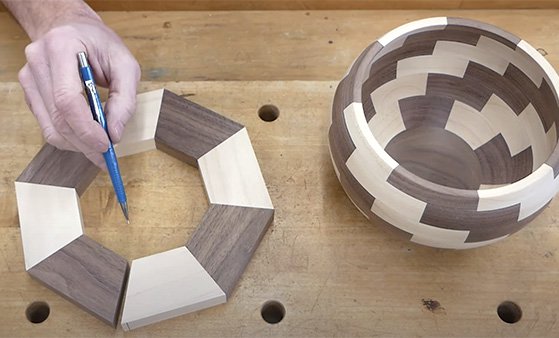
Feature Rings
Many segmented bowls have a feature called a Feature Ring. The zigzag components turn on each side creating a lightning-like pattern in the ring. The final turning is then sanded down to 600 grit, and coated with clear lacquer. These ring shapes can be used as home decor items or gifts. This 120-minute DVD will show you how to make segmented jars.
Construction of rings
There are many methods to make rings for segmented timber turnings. Some include a combination stave and ring construction. The technique can also be used with solid non-segmented wood. Wood expands perpendicularly to its moisture content and grain. A non-parallel grain direction may affect the shape and appearance of the ring. The turner should consider this when designing the segmented turning.
Stave construction
There are two types of segmented wood-turning: the ring and the stave. For some projects, the ring construction is the most popular. However, stave construction can be more prevalent. Although both styles have their advantages, ring construction may be easier to master and more appealing for beginners. This article will show you the differences in ring and stave construction and how to apply them on your next segmented projects.
Solid wood
When making solid wood segmented turnings, accuracy of miter angles is crucial. The width of segments will vary depending on how large the ring is. PVA glue should be used with the grain against the grain to glue segments together. Pairs of segments may be glued together at once. Clamping rings with hose clamps can be used to hold them together. For eight segments, it is recommended to use a miter angle in the range of 22.5 degrees.
Floating base
When creating segmented wood turnings, you should avoid using a flat or sloping base. A floating base can prevent base failure by minimizing stress on the piece. Floating bases can easily be made out of a half mortise joint. The solid disc fits in between the gaps, allowing the wood freedom to move. Floating bases can be made from quarter-sawn lumber, which is more stable than plain-sawn. A floating base should have a diameter of less than 6 inches.
FAQ
How much should a Woodworker Charge per Hour?
The hourly rate for a professional Woodworker will vary depending on many variables, such as experience, skill level and availability.
An hourly wage for skilled woodworkers is between $20 and $50.
A woodworker with less experience may be able to charge $10 an hour.
What tools should I start with when becoming a woodworker?
Woodworking is an art that takes patience and practice. It takes time for you to master the different techniques and tools that are required to woodwork.
There are many different types of woodworking equipment available on the market today. Some prefer to use power tools, while others prefer to use hand tools.
Your choice, however, is up to you. However, you need to ensure that the tool you use is the right one for the job. It may be a good idea to start with a basic set, if possible, if you don’t know much about hand tools.
A router is a tool that cuts intricate shapes in wood. You can also learn how to use it. These are available at most hardware stores.
What woods are suitable for making furniture?
Woods are classified based on their hardness. Softwoods include pine, fir, cedar, and cypress. Because they are resistant to rot, softwoods are often used as outdoor furniture. These hardwoods include maple, mahogany and teak. They're generally used indoors because they won't weather well outdoors.
What is the main difference between plywood or particle board?
Plywood is made up of layers of wood pressed together under pressure. Plywood can be cut to different thicknesses. It's commonly used as flooring and cabinets. Particle board is made of sawdust and resin that has been compressed into large blocks. It's used for home improvement projects. Both boards are strong and can be easily cut.
Statistics
- The best-paid 10 percent make $76,000, while the lowest-paid 10 percent make $34,000. (zippia.com)
- Most woodworkers agree that lumber moisture needs to be under 10% for building furniture. (woodandshop.com)
- Overall employment of woodworkers is projected to grow 8 percent from 2020 to 2030, about as fast as the average for all occupations. (bls.gov)
- Average lumber prices rose about 600 percent between April 2020 and May 2021. (familyhandyman.com)
External Links
How To
Here are some tips on how to drive nails in wood
It is essential to pick the right size and style of hammer before you can drive a nail in wood. Claw hammers include mallets, claw hammers (sledgehammers), mallets, ball-peen hammers, hatchets, and mallets. Each type of hammer has its pros and cons. A clawhammer works best when hitting something hard like nails. However, it can sometimes be difficult to see exactly where the strike is going. A sledgehammer allows you to hit large areas simultaneously, but it is too heavy and cumbersome to use for small tasks.
After you've chosen the right tool, hold your hand flat to the handle so it rests comfortably in one of your palms. Grip the handle firmly, but don't squeeze it so tightly that you hurt yourself. The hammer should be held straight up with your wrist relaxed. Then swing the hammer back toward the ground, aiming for the center of the nail. You should feel the impact of the hammer striking the nail. If you're having trouble getting the hang of swinging a hammer, practice with a block of wood until you get the rhythm down.
Hold the hammer near your body until you're ready for the nail to be driven. The nail should be perpendicular to wood's surface. Your eyes should be focused on the nail's tip. Then, swing the hammer forward. Next, follow the motion of your hammerhead. Keep doing this until you are comfortable with the swing. After mastering the technique, you can add power to your swings. Try holding the hammer above your shoulder and bring it down forcefully. This way, you'll be able to put more energy behind your blows.
Once you've made the first nail hole, take out the hammer. Use a pry bar or screwdriver to pull out the rest of the nails. Keep the nails heads in line with the surface of the board to prevent splitting the wood.